Sunday, March 30, 2008
A little bit vintage, a little bit country...
a little bit shabby chic. Okay, I like alot of different styles. Bella Pink Cafe is somewhere I have just found that really fits alot of my tastes. Wow!! What an amazing place to find inspiration. She has an amazing eye for design, pretty little bits and is happy to share them on her blog. How lucky are all of us to be sharing each others blogs? I love it. It makes the world seem a smaller, more friendly, sharing place. :) What is your style? Check out her Wriskey Collection. I think i may need to own some of these items. ;) Have a great evening. See you tomorrow.
Saturday, March 29, 2008
Family & Friends
Do you keep in touch often with your family & friends? I mean more than on holidays. I keep in contact with my family here in Alaska and my close circle of girlfriends almost every day. However, I seem to be a bit slacking in the communication department with my other dear family & friends. I feel so badly about this. My challenge to myself and to those of you like me is to stock up on my card stash and start sending cards just because. Maybe even a circle journal with some who I think will do it and have the time to do it. :) I can think of so many occassions and everyday celebrations I have missed sending a written note for. Well I am going to try and stop that nonsense. ;) Letting those who are close to me that I am thinking of them is well worth the effort of writing and the cost of postage. I have a dear friend and a grandfather who may not be with us here on earth for much longer and there are so many things I wish I would have said to them or done for them. I know they know I care and love them, but I could have made more everydays special days. Celebrate today! Live your bliss! No regrets!
Friday, March 28, 2008
Pretty little pail
These pails are so fun to decorate, fill and give! Last year Becky & I bought a bunch of these pails for our National Scrapbook Day crop and used them for goodie bags. We filled them with some fun items and every attendee recieved one at their seat. Good times! Well, I have a few leftover and this is what I did with one. I am envisioning it filled with buttercream mints, or vanilla bean bath salts, or maybe decadent chocolate covered espresso beans. Oh, the possibilities!! 
 Recipe~ Patterned Cardstock: My Minds Eye; Cardstock, Papertrey; Ink: Stampin' Up; Stamp: Papertrey; Die Cuts: Cuttlebug & Quickuts; Ribbon: Clost To My Heart, Martha Stewart, Chatterbox, Making Memories & vintage seam binding; Rhinestone Brad: Karen Foster; Pail: Stampendous; Misc. Supplies: chipboard, embroidery floss, beads & wire.
Recipe~ Patterned Cardstock: My Minds Eye; Cardstock, Papertrey; Ink: Stampin' Up; Stamp: Papertrey; Die Cuts: Cuttlebug & Quickuts; Ribbon: Clost To My Heart, Martha Stewart, Chatterbox, Making Memories & vintage seam binding; Rhinestone Brad: Karen Foster; Pail: Stampendous; Misc. Supplies: chipboard, embroidery floss, beads & wire.
Thursday, March 27, 2008
The Yummies!


 I found this scrumptious recipe at Hershey's. Perfect goodies to put in this box. It is similar to the 2-4-6-8 easter boxes I made, but this box is taller so it could hold a small cupcake, a few truffles or other little goodies. This design reminds me of a wedding favor. I love the simple elegance. The bird is colored with a clear glitter marker over the white. A subtle detail, but beautiful when it catches the light and sparkles. :)
Recipe: Cardstock: Prism; Pattern Paper: American Crafts; Ink: SU!; Markers: Copic; Stamps: Hero Arts (Bird & branch), PaperTrey (sentiment); Ribbon: Close To My Heart; Pop dots & 2-4-6-8 template to make box.
Off to the vet
I have to take Max to the vet this morning. So, I will be posting later this afternoon. He is not walking on his back right leg. I think maybe he slipped on some ice in his pen. ??? But, he also has some itchy (maybe allergy) issues. We think. Again ????? I am sure we will come home witha load of antibiotics, creams, prescription food and a cone (so he can't scratch his ears). ;) Lifting him into the back of my suv should be interesting. He is around 90lbs.
 Well, we have ear drops, ear ointment, 2 types of pills and some new 'allergy' food to try. I need a spreadsheet just to keep the medications straight. The good news is it should clear him up. He has a horrid yeast infection everywhere. :( He goes back in 2 weeks for a follow up and he was given a shot today to help stop some of the itching. He is only 6 yrs old so he should be with us for a good long time. :)
Well, we have ear drops, ear ointment, 2 types of pills and some new 'allergy' food to try. I need a spreadsheet just to keep the medications straight. The good news is it should clear him up. He has a horrid yeast infection everywhere. :( He goes back in 2 weeks for a follow up and he was given a shot today to help stop some of the itching. He is only 6 yrs old so he should be with us for a good long time. :) Wednesday, March 26, 2008
In addition
to my regular post today I wanted to share a few photos of a visitor at our house this morning. He is soaking up some morning sun on the backside of our house. I bet that grass feels better than sleeping on the crunchy snow and ice. Spring is on the way!!! :)

Two for One
Can you see thru it? If your answer is yes, then you are in baby! ;) Transparencies and acrylic are so hot right now they could almost melt. You can use a transparency or acrylic just like you would use paper. There are some amazing designs, tutorials and templates available. I will try and bring some here for you.
Transparency Card
Make A Wish Window Box
Sheer 5 Ring Tab Book
Tip: Acrylic and transparencies are not porous. That means ink will not absord into it. So if you are NOT using, staz-on, alcohol ink or painting on it, it will probably need to be heat set or it will rub off or smear.
These are some cards that I have been working on.

 The first is a spinner card. The little bird (from SU!: Pun Fun) spins across the opening on the front of the card.
Transparency Card
Make A Wish Window Box
Sheer 5 Ring Tab Book
Tip: Acrylic and transparencies are not porous. That means ink will not absord into it. So if you are NOT using, staz-on, alcohol ink or painting on it, it will probably need to be heat set or it will rub off or smear.
These are some cards that I have been working on.
The first is a spinner card. The little bird (from SU!: Pun Fun) spins across the opening on the front of the card.This card is using my new Hero Arts owl set and Cuttebug embossing folder. Did you notice both cards are bird themed? ;) Another super hot trend right now!! And, I colored the images with my Copic markers. Betty, at Stamp Attic, was so gracious to share a few important tips and tricks with me for coloring with my Copics. If you live in the Anchorage area you really should try and stop by her store or attend one of her many monthly classes. You will learn alot and be totally inspired by all of the great projects in her store. She has an amazing offering of the best products on the market!
Monday, March 24, 2008
Back on track
Whew! What a busy couple of days. Sorry to slack off on my blog. Holidays do that to me. Everyone congregates at our house. Which means I do alot of prep work and clean up. But, I wouldn't trade having my family around for no holiday craziness. ;)
The winner for the coffee cozy (drawn by Miss Marissa) is comment #1: Michelle!! I have a few cozies for you to choose from or you can give me a request.

Stamp your image onto Whisper White cardstock using a Classic inkpad (I used Chocolate Chip). Open the brush end of your marker (Barely Banana & So Saffron) and make a spot of color for each shade on the plastic sheet cover. TIP: Using the plastic sheet cover with white paper is an easy way to see the colors you have selected and it just wipes clean when you are done and can reuse it. Use your Blender Pen and pick up a bit of color with the tip of the pen. Start with your lightest color first. Fill in the image you are coloring with your lightest color. Remember, these are waterbased markers and blender pen, so be careful 'blending' too much. Over'blending' may cause your paper to oversaturate and begin to breakdown. You will know because your paper will start pulling up fibers and not looking smooth. You can tell I did this on this first layer. OOPS! ;)
 Next, use your darker shade and blend from the bottom up in a feathering stroke. When shading, try and think about how light hits an object and be consistent. A beak would cast a small shadow under it. The bottom side of a wing may be darker than the top. Play with it and have fun with different looks. There are really NO Rules! :) Also, when you first start blending where you first place your color it will be the darkest.
  Continue this process until your image is completely colored. I used my Going Gray marker and blender pen to add abit of shading around the entire image to make it look more dimensional.
 To clean your blending pen between color changes just rub it on a scrap piece of paper until no more color comes off. You can do this very gently, no need to scrub. Keeping the tip of the pen on its side will keep you from crushing the fine tip. Even thought the tip may be stained from dark colors it will not transfer that color. I used this pen and you can tell it did not transfer any dark colors even when I used the lightest yellow color. :) Very cool!
 I hope you enjoyed the tip today. Here are a few photos from yesterday. Our egg masterpieces, the little chef and the second round of dominoes of the day (Doug, Carol, Cody & Robert).


The winner for the coffee cozy (drawn by Miss Marissa) is comment #1: Michelle!! I have a few cozies for you to choose from or you can give me a request.
Today's tip is for using your SU! markers and blender pen. I love a soft, watercolored look to my stamped images. These are the supplies I used. All are from SU! unless otherwise noted. Pun Fun stamp image;Chocolate Chip Classic inkpad; Markers: Barely Banana, So Saffron, Gable Green, Green Galore, Pumpkin Pie, Tempting Turquoise, Opulent Orchid and Going Gray; Whisper White cardstock; Blender Pen; and a plain piece of printer paper slipped inside a plastic sheet cover (not SU!). All stamp images are copyright SU!
Stamp your image onto Whisper White cardstock using a Classic inkpad (I used Chocolate Chip).
Open the brush end of your marker (Barely Banana & So Saffron) and make a spot of color for each shade on the plastic sheet cover. TIP: Using the plastic sheet cover with white paper is an easy way to see the colors you have selected and it just wipes clean when you are done and can reuse it. Use your Blender Pen and pick up a bit of color with the tip of the pen. Start with your lightest color first. Fill in the image you are coloring with your lightest color. Remember, these are waterbased markers and blender pen, so be careful 'blending' too much. Over'blending' may cause your paper to oversaturate and begin to breakdown. You will know because your paper will start pulling up fibers and not looking smooth. You can tell I did this on this first layer. OOPS! ;)Next, use your darker shade and blend from the bottom up in a feathering stroke. When shading, try and think about how light hits an object and be consistent. A beak would cast a small shadow under it. The bottom side of a wing may be darker than the top. Play with it and have fun with different looks. There are really NO Rules! :) Also, when you first start blending where you first place your color it will be the darkest. Continue this process until your image is completely colored. I used my Going Gray marker and blender pen to add abit of shading around the entire image to make it look more dimensional.To clean your blending pen between color changes just rub it on a scrap piece of paper until no more color comes off. You can do this very gently, no need to scrub. Keeping the tip of the pen on its side will keep you from crushing the fine tip. Even thought the tip may be stained from dark colors it will not transfer that color. I used this pen and you can tell it did not transfer any dark colors even when I used the lightest yellow color. :) Very cool!I hope you enjoyed the tip today. Here are a few photos from yesterday. Our egg masterpieces, the little chef and the second round of dominoes of the day (Doug, Carol, Cody & Robert).
Sunday, March 23, 2008
INSPIRATIONAL!
Okay, this is an amazing blog for checking out inspiration from other bloggers. I am one of her 'team' members. All I do (twist my arm ;)) is find projects on blogs that I visit and ask them if it is alright to be featured on Inspirational's blog. Well, who doesn't like to be featured? So, if you see someone's work that you think I should check out, please send me the link.
Happy Easter to everyone! I will announce yesterday's winner in a bit. I have a few eggs to hide before the kiddos get up. Tomorrow, I will be back on my regular schedule.
Happy Easter to everyone! I will announce yesterday's winner in a bit. I have a few eggs to hide before the kiddos get up. Tomorrow, I will be back on my regular schedule.
Friday, March 21, 2008
Changing it up a bit!
Ok, so I have some fun, new ideas that I think you will all enjoy. Since sketches can be found just about everywhere they will be taken off my Daily Dose list and added to the Places I Visit list.
Tuesday - Trends & Styles: What's in, What's back 'in', What is it? and other cool stuff.
Wednesday - Cards & Tags: Sending your messages in style!
Thursday - Yummies!: Now that you know how to make (or have a stash of) all these great boxes and bags what do you put in them? Candy, cookies, mixes and other delightful goodies.
Sunday - Shoppin' & Surfin': What cool finds have you found? Favorite places to spend your $$. Share any good deals and neat stuff you want right here. :)
I hope you think these are good changes. I think it will be fun trying to come up with posts and see what your comments are. Off to do more Easter shopping. Gotta hop to it! ;)
Wednesday, March 19, 2008
The color of friendship
 They say yellow roses mean friedship. Well, what about a yellow candle? This is a lemon verbena jar candle from Michaels. I just added a few bits of paper (Bazzill & K & Co.), stamps (Close To My Heart) and a ribbon. What a cute gift idea, right? Well, these are the color combo for today. Be happy!
Monday, March 17, 2008
Lots of Card Sketches & NEW SU! Promos
WOW!! Check out Card Positioning Systems. There are too many great ideas on this site to choose just one, so GO CRAZY!! Find a sketch you love and give it a whirl. Leave a comment and tell me what you think of this site. I will be adding it to places I visit. :) ENJOY!
SU! Kicks off their NEW promotions today! Check them out at these links.
FREE WHEELIN'
Wild for Wasabi
EXTRA, EXTRA Hostess
SU! Kicks off their NEW promotions today! Check them out at these links.
FREE WHEELIN'
Wild for Wasabi
EXTRA, EXTRA Hostess
Happy St. Patty's Day!
So proud to have a wee bit o' the Irish in my blood. If you know me it is probably pretty obvious. ;)


 I hope this helps a bit. It is probably easier to see a demo of this, but I need to learn how to do the video tutorials first. :)
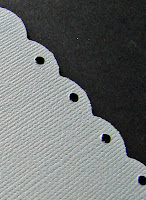
Today's technique is how to make your own scallop edge using a corner rounder. I am using the EK Success medium corner rounder with the guard removed, Bazzill cardstock and my WRMK Crop-a-dile for an added accent.
Make your first punch at the edge of your paper.
Line up your punch so that the far left, upper corner of the 'rounder' part is overlapping the already punched part of the last scallop. (Clear as mud?) Click on the photo to enlarge it to see the detail.
This is what your scallop line will look like. I haven't figured out how to make the corners look as uniform as I would like. If you know the 'trick' to do this please share here. :)
I used the small punch on my Crop-a-dile to add a punch to the center of each scallop. Gives it a bit more detail.
I hope this helps a bit. It is probably easier to see a demo of this, but I need to learn how to do the video tutorials first. :) Sunday, March 16, 2008
Today's Featured blog and other goodies
I love antiques and vintage items. Repurposing items and giving old items a new life. Well, Andrea is living the dream. Her handmade items are just GORGEOUS! A real eye for color, design, quality and vignettes. Reading thru her blog Velvet Strawberries
you will discover what a treasure she is. She has an amazing on-line store One Hundred Wishes. I am a customer of her store and I love every yummy item I have recieved. :) And, the best part is it comes packaged so nicely. She really puts a lot of effort and thought into making sure you feel special and appreciated when recieving items from her store.
This weeks challenge is really just a great way to share some info about yourself. I am sitting here typing and sipping my homemade mocha in a paper cup I stamped with my new SU! stamps and inks. Each cup has a Pun Fun image in one of the In-Color inks. My cup this morning is the cat (purrrfect!) in river rock ink. :) Anyway, I was wondering what your favorite hot beverage is? Leave a comment on this post telling me your favorite hot beverage and this coming saturday, March 22nd, I will draw a name to win a handmade, felt coffee cozy made by me. :) Here is the pic of the cozies I am making. Please leave a comment and let me know what you think. I will be selling these as soon as I have a bigger inventory to select from. :)


Thanks for visiting me. Have a great day!
you will discover what a treasure she is. She has an amazing on-line store One Hundred Wishes. I am a customer of her store and I love every yummy item I have recieved. :) And, the best part is it comes packaged so nicely. She really puts a lot of effort and thought into making sure you feel special and appreciated when recieving items from her store.
This weeks challenge is really just a great way to share some info about yourself. I am sitting here typing and sipping my homemade mocha in a paper cup I stamped with my new SU! stamps and inks. Each cup has a Pun Fun image in one of the In-Color inks. My cup this morning is the cat (purrrfect!) in river rock ink. :) Anyway, I was wondering what your favorite hot beverage is? Leave a comment on this post telling me your favorite hot beverage and this coming saturday, March 22nd, I will draw a name to win a handmade, felt coffee cozy made by me. :) Here is the pic of the cozies I am making. Please leave a comment and let me know what you think. I will be selling these as soon as I have a bigger inventory to select from. :)
Thanks for visiting me. Have a great day!
Saturday, March 15, 2008
And the winner is...
KIM-KATHIE KNUDSEN!!!! You are the winner of the rub-ons from SU! Sale-A-Bration!!! Congrats! I will be getting them to you as soon as you email me with your mailing address. Thank you to everyone who left me comments. :) Today ended up being busier than I had planned for and it was a blast!! So, tomorrow I will be posting the next goodies to be given away. Off to dreamland, Goodnight.
Friday, March 14, 2008
Here comes Peter Cottontail...

I learned how to weave a reed basket this summer by my aunt Marjie. She is a professional basket weaver and has many other talents that make her just amazing. *:)* Well, when I saw this tutorial for weaving a paper basket, I thought, I can do that. Well, weaving paper is a bit more tricky than I thought. But, it is very 'doable' once you get the feel for it. I made this basket for Marissa and will be making another one this weekend for Cody. What a neat handmade with love piece to hand down. Here is the tutorial for this basket:http://www.wishyouwerehere-laura.blogspot.com/search/label/Basket%20Tutorial Oh, and the cute brads are from Making Memories Easter Collection. I LOVE them!
Another tutorial I found:http://confessionsofaribbonaddict.blogspot.com/2008/02/my-basket-tutorial.html It is a different style basket, but easier and just as cute!
Don't forget tomorrow is the drawing for the rub-ons blog candy giveaway. Make sure to leave me a comment to be entered. Oh, and a way to contact you if you win!
Thursday, March 13, 2008
Scrapbook Sketch #2

Again, thanks to Pagemaps for this weeks inspiration. Being able to use multiple photos on a lyaout is a big deal, I think. ;) Please share your take on this sketch with me. Just add a link in the comments section. Enjoy!


 This is my project from yesterday's color combo. I found the template for the box here: http://sonjascene.blogspot.com/ Sonja has a lot of really great templates and ideas to share. :)
Recipe: Cardstock: Soft Sky, Basic Back & River Rock; Pattern Paper: Close To My Heart; Ink: Soft Sky; Rub-on: Love & Happiness (Sale-A-Bration reward book); Ribbon: Soft Sky; Brads: Close To My Heart; Chipboard: Cosmo Cricket; Glitter: Martha Stewart & Stickles; Flowers: Michaels (bridal aisle); Stamps: Technique Tuesday; Misc. Supplies: transparency sheet, circle punch, pop-dots, Xyron 150 sticker maker & Hershey Nuggets.
Wednesday, March 12, 2008
Color Combo #1
 Basic Black, River Rock, Soft Sky & Whisper White
 (All colors are from SU!)
Looking outside today inspired this color combination. These are the colors I am looking at from my seat at the laptop on the kitchen island. I love the elegant look of these colors together. They could inspire a wedding project or winter scrapbook page. I am off to play with the combo and will post my project soon.
Tuesday, March 11, 2008
Card Sketch #1
 Today's card sketch is from Pagemaps. I thought it was the perfect follow up sketch to yesterday's tip of the week. It is such a versatile sketch to hilight any great embellishments you have. You can check out the pagemaps site for more inspiration for using this sketch.Below is my take on this sketch. Have fun creating!
Tip of the Week
Do you find attaching glitter and or flock to small items to sometimes be a challenge? Not any more! Using the sticker maker machines from Xyron you can make your own decorative embellishments easy-peasy. Below I have photos and descriptions on how to do this:
 I am demonstrating the Xyron 150 Sticker Maker with the permanent adhesive cartridge. The butterfly punch and glitter are from the Martha Stewart line at Michael's. The fun flock is from Stampendous. I punched the butterfly from thin, white core chipboard.
  Gently push your shape into the X150 until your feel it stop. Making sure the side you want to attach the glitter to is face down. Turn the X150 to the other side and gently pull the adhesive strip out of the machine. Stopping after your shape is past the cutting teeth. Pull the adhesive strip up againt the cutting teeth and tear the strip off.
  Rub the shape while it is still in protective paper. Peel away the clear top paper and then remove the white paper, this is the sticky side.
  Sprinkle with glitter. Shake off any excess glitter. Your done. If you want to make this a sticker you can now run it back through the X150, glitter side up this time.
I hope this makes sense. If you still have questions please leave me a comment or an email. :)
Sunday, March 9, 2008
Today's Featured blog!
PRINT & PATTERN - http://printpattern.blogspot.com/
If you are looking for some inspiration for design or color look no further. This blogger posts the newest and hottest trends from around the world. :) I love visiting this blog at least once a month to see what hot, new ideas are being shared. She also shares many a place to shop if you really like what you see. ;)
If you are looking for some inspiration for design or color look no further. This blogger posts the newest and hottest trends from around the world. :) I love visiting this blog at least once a month to see what hot, new ideas are being shared. She also shares many a place to shop if you really like what you see. ;)
Friday, March 7, 2008
Papercraft - Easter Candy Box


This little peek-a-boo box is just the perfect size for a nest of m&m's, jellybeans or other small treat for Easter. As you can see I used some buttons. I haven't shopped for Easter candy yet, I would be snacking on it if it was around. ;) This box can be used as a favor box for any event. Just mix up the paper and lid topper. The tutorial for making this box is here: http://www.splitcoaststampers.com/forums/showthread.php?p=7329573 (just scroll down a bit on the page to print the template as a word document.) I used American Crafts Paper from their spring line and a transparency sheet for the 'window'.
Thank you so much to everyone who has left comments so far. :) Please feel free to share this blog with your friends. And, for those of you who have never tried rub-ons or are struggling with them I will try and help with a few tips.
1. Quality does matter when it comes to rub-ons. If they are to dry they will not rub-on with out alot of rubbing. So, you want a nice 'creamy', smooth rub-on that will rub-on to your project with out much pressure. Some of my favorites are: American Crafts, SU!, Scenic Route, K&Co.
2. Try cutting out just the design you will be rubbing on your project. This lets you align it more easily and you will not accidentaly rub-on part of another design you don't want.
3. Make sure to store the unused designs with the backing paper it came with. If you don't the designs will stick and rub-on to anything they lay against.
4. If you mess-up or don't like the way your rub-on looks you can use scotch tape to 'lift' it off. Just gently press the scotch tape to the rub-on and pull up gently.
5. If all of your design did not transfer onto your project, don't panic. Just realign your design and rub-on the remaining parts.
I hope some of these tips help. If I did not answer your question please feel free to ask me more. :)
TGIF! Have a great weekend!
Thursday, March 6, 2008
Scrapbook Sketch & Blog Candy Giveaway!

I love PageMaps! They offer the best sketches for all sizes and types of projects. I will be featuring many sketches from their site. You can also find the link under 'Places I Visit' (in the sidebar to the left). I will be posting my page using this sketch later today. :) Happy scrappin'!
Ps: Click on the image to enlarge it.

The Blog Candy Giveaway for leaving a comment on this blog is the fabulous NEW Rub-ons from SU! These are only available in the Sale-A-Bration reward catalog. You cannot buy these. They come in a pack of 4 fabulous colors( Black, White, Old Olive & Chocolate Chip) and they are big sheets (5 7/8 x 12 inches)! I have already used mine and they rub on so smoothly. :) For more info on Sale-A-Bration see the link to the left 'Catalog' link.
HOW TO LEAVE A COMMENT: At the bottom of today's post is the word 'comments'. Click on that word and that is where you will type in your comment. If you do not want to subscribe you can leave an anonymous comment. Just don't stay anonymous ;) put your name and/or email in your message so I know how to contact you if your name is drawn. :)
Wednesday, March 5, 2008
More boxes!


I love making and filling boxes! How fun it is to give treats and goodies to those that bless our lives. Friends, teachers, co-workers or anyone that is special or helpful. I think that is why I find crafting so rewarding. Being able to feel proud of the items I make and share with others. :)
The easter wrapped candy bars are so simple to do and the stamp is from the $1 bin at Michael's. I will try and put a tutorial together in the next day or so. It will be my first, so it may take some practice. ;)
The Magic Box is from this amazing blog http://polkadothouse.blogspot.com/2008/02/magic-boxes.html She was so generous to put a video tutorial together and share. I think I will be asking her for some help with my blog design. ;) It needs a bit of sprucing up. A little pizzazz!
Look for a few more box and easter ideas shortly. I am on a roll.
Subscribe to:
Posts (Atom)